Using Cloud Custodian to automate governance, cost control and clean up.
Introduction
In AWS we have Config rules that can assist us with governance of our cloud accounts such as by ensuring all S3 buckets have encryption enabled and notifying us when a violation is detected. Whilst the list of managed rules is reasonably long (83 are available at the time of writing) it’s easy to run into a situation that is not covered by the provided rules. To solve this we could write our own custom rules however we’d now be responsible for writing the Config rule definition, a Lambda function, ensuring the Lambda is correct and has tests available, deploying it and the associated Config rule and maintaining everything going forwards.
Another shortcoming of Config is that it only gives us a notification of something being wrong, wouldn’t it be better, at least in some circumstances, that we take corrective action as well? We can achieve this in a similar way to custom Config rules but instead use CloudWatch Events to trigger the Lambda function. This would also reduce the number of invocations (and cost) because we could be more specific on the trigger, such as only on a specific resource being created. Unfortunately CloudWatch Event syntax is cumbersome and poorly documented, I have often resulted to using the AWS Console to create my rule before transcribing it to CloudFormation, and we’re still left with the problem of creating, testing and maintaining everything.
Cloud Custodian
Enter Cloud Custodian, a Python tool written by Capital One that provides a YAML DSL that allows you to define policies that are applied to your cloud account(s) in a managed way. There are numerous use cases for this tool, so far at KZN we have found uses in automated governance, such as ensuring all resources are correctly tagged and that they are not publicly accessible, and cost control, such as turning non-production resources off outside of work hours and deleting all resources after a time period from sandbox accounts.
Cloud Custodian has several running modes that can be utilised depending on the policy you’re applying and it’s urgency. For example, if you want to ensure SageMaker Notebooks are only ever deployed within a private VPC you may wish to use the cloudtrail mode so that Notebooks are terminated ASAP, if you wish to add an action to a Config rule (such as deleting or encrypting unencrypted S3 buckets) you could use the config mode or if you wanted to tidy up old resources in a sandbox that developers sometimes leave hanging around you may wish to just run all rules once a day from a Fargate task.
Example - SageMaker security
The example we’re going to look at today is the SageMaker scenario where we wish to prevent Notebooks from being created that have access to the public internet or are unencrypted. We’ll cover writing the policies themselves (which are based on the documentation), setting up notifications, creating a CI/CD pipeline to manage everything and tricks that will make our job easier. Whilst only code snippits will appear here the entire code is available in our repository or launch the stack to follow along.
The policy
To begin with we need a policy that will detect and tag non-compliant Notebooks. We will trigger the policy off the CreateNotebookInstance CloudTrail event which we can find in the API documentation, so lets place the following in sagemaker.yml:
policies:
  - name: sagemaker-notebook-tag-non-compliant
    resource: sagemaker-notebook
    mode:
      type: cloudtrail
      events:
        - source: sagemaker.amazonaws.com
          event: CreateNotebookInstance
          ids: "responseElements.notebookInstanceArn"
Next we would like to add a filter to only act on Notebooks that either have access to the public internet or are not encrypted. Conveniently Cloud Custodian provides us with a set of operators that we can use to compose our filters against the contents of the request contained in the CloudTrail event:
filters:
  - or:
    - DirectInternetAccess: Enabled
    - KmsKeyId: absent
Finally we add an action to our rule, in this case tagging the resource with NonCompliantTag. We can see the list of available actions available by interrogating the tool with custodian schema aws.sagemaker-notebook.actions:
actions:
  - type: tag
    key: NonCompliantTag
    value: "TRUE"
Now that we’ve identified and tagged the offending resource as non-compliant we need to consider the lifecycle of SageMaker Notebooks, we can’t immediately delete them as they need to be “Stopped” and we also can’t immediately stop them as they need to be “InService” (i.e. having completed creation). To address this lets use another of the rule modes, periodic, to create two more rules to take the Notebook through it’s lifecycle:
- name: sagemaker-notebook-stop-non-compliant
  resource: sagemaker-notebook
  mode:
    type: periodic
    schedule: "rate(5 minutes)"
    timeout: 45
  filters:
    - "tag:NonCompliantTag": "TRUE"
    - NotebookInstanceStatus: InService
  actions:
    - stop

- name: sagemaker-notebook-delete-non-compliant
  resource: sagemaker-notebook
  mode:
    type: periodic
    schedule: "rate(5 minutes)"
    timeout: 45
  filters:
    - "tag:NonCompliantTag": "TRUE"
    - NotebookInstanceStatus: Stopped
  actions:
    - delete
Now the basic policy is in place lets install Custodian with pip3 install c7n and run custodian validate sagemaker.yml against it to ensure we’ve defined it correctly and dry run it with run –dryrun -s out sagemaker.yml to see what it will do, note you’ll need to have logged in to your account in the same way you would to use the AWS CLI. If you’re satisfied you can deploy it with run -s out sagemaker.yml and create a test Notebook either unencrypted or with public access and observe each step taking place as it transitions through it’s lifecycle. Each Lambda function will log to CloudWatch under /aws/lambda/custodian-sagemaker-notebook-delete-non-compliant and similar, allowing you to see when the functions are invoked and troubleshoot any issues.
Notifications
It would be polite to notify our users when we delete their resources so that they can correct what they did wrong so lets take a look at a utility shipped along side Custodian, Custodian Mailer. This utility can be connected to Cloud Custodian via an SQS queue and we can control it’s behaviour from our policies with the notify action. This isn’t the only way to get notifications out of Custodian, if you need to hook it up to your existing notification framework an SNS delivery mechanism is also provided though you’ll likely need to write your own transformation between what Custodian emits and what your framework expects.
Mailer runs as a Lambda function that executes periodically and is configured with a simple YAML config file and requires the SQS queue and the role the function executes as to be created for it. For exploratory purposes lets do this manually for now, later on we’re going to automate everything because we’re good people. Create the SQS queue in the console and a new IAM role with the following two policies, substituting the queue’s ARN:
{
  "Version": "2012-10-17",
  "Statement": [
    {
        "Action": [
            "sqs:GetQueueAttributes",
            "sqs:GetQueueUrl",
            "sqs:ListDeadLetterSourceQueues",
            "sqs:ListQueues",
            "sqs:ReceiveMessage",
            "sqs:DeleteMessage"
        ],
        "Resource": "arn:aws:sqs:***:***:***",
        "Effect": "Allow"
    }
  ]
}

{
  "Version": "2012-10-17",
  "Statement": [
    {
        "Action": [
            "logs:CreateLogGroup",
            "logs:CreateLogStream",
            "logs:PutLogEvents"
        ],
        "Resource": "*",
        "Effect": "Allow"
    }
  ]
}
Now we can create Mailer’s configuration file, substituting the queue’s URL and role’s ARNs:
queue_url: https://sqs.***.amazonaws.com/***/***
role: arn:aws:iam::***:role/service-role/***
region: '***'
Finally we can deploy mailer:
pip3 install c7n-mailer
c7n-mailer --config mailer.yml --update-lambda
In this example we’re going to assume our notifications are provided via Slack but Mailer can provide e-mail as well as a number of other platforms. In order for our policy to actually emit notifications we need to add a new action to it, specifying the queue URL and Slack webhook:
- type: notify
  violation_desc: Resource will be removed due to non-compliance.
  action_desc: ":crying:"
  to:
    - https://hooks.slack.com/services/T00000000/B00000000/XXXXXXXXXXXXXXXXXXXXXXXX
  transport:
    type: sqs
    queue: https://sqs.***.amazonaws.com/***/***
This would be a good time to mention a feature of YAML that very much helps in DRYing up your policies: anchors and aliases. Instead of having to copy/paste the above YAML object in every location where we want a notification we can instead do this:
vars:
notify-non-compliant: ¬ify-non-compliant
type: notify
violation_desc: SageMaker Notebook will be removed due to non-compliance.
action_desc: ":crying:"
to:
- https://hooks.slack.com/services/T00000000/B00000000/XXXXXXXXXXXXXXXXXXXXXXXX
transport:
type: sqs
queue: https://sqs.***.amazonaws.com/***/***
policies:
- name: sagemaker-notebook-tag-non-compliant
resource: sagemaker-notebook
mode:
type: cloudtrail
events:
- source: sagemaker.amazonaws.com
event: CreateNotebookInstance
ids: "responseElements.notebookInstanceArn"
filters:
- or:
- DirectInternetAccess: Enabled
- KmsKeyId: absent
actions:
- type: tag
key: NonCompliantTag
value: "TRUE"
- *notify-non-compliant
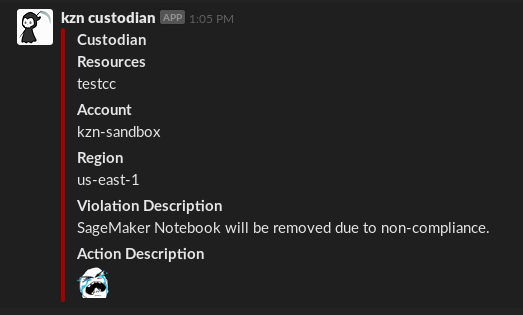
Note that the top level vars key and the notify-non-compliant are placeholders, the later can be named anything. For our simple example it might not seem worthwhile but it’s invaluable once you have more than a dozen rules or so. After re-deploying the policy the resulting notification will include the resource name due to the default template used by Mailer:
Automation
With the above we now have a system that will automatically delete Notebooks that violate our policy after sending a notification about it to a Slack channel. This is excellent and will assist our Data Scientists from leaking our secrets out to the world but it would be much easier if we were to keep all our policies in a repository and deploy them automatically. DevOps!
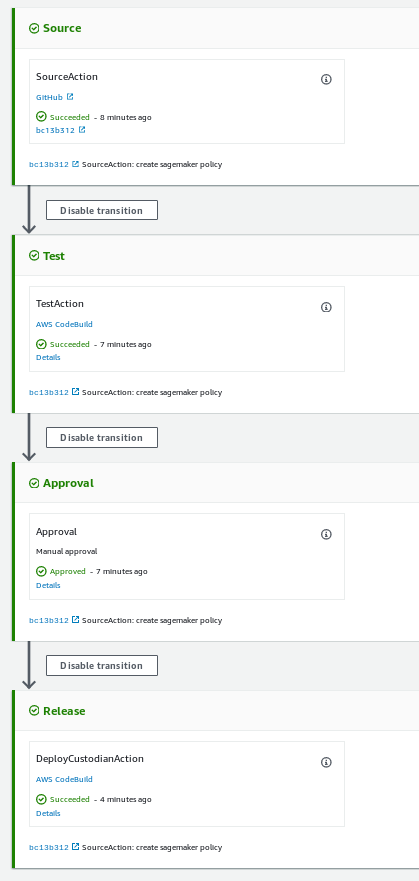
To automate the deployment we’re going to create a CodePipeline that will:
- Checkout our repository after being triggered by a GitHub webhook
- Validate the policies and perform a dry run, storing the output in an S3 bucket
- Hold at a manual gate to allow us to review the dry run results
- Deploy the mailer and the policies once the gate is approved
We’re not going to list the complete CloudFormation here as it’s available in our repository, however lets go over a couple of the important parts.
Our test step is going to install Cloud Custodian, validate all policy files in the regional directory and then do a dry run. We group each set of rules in their oun policy file for maintainability going forwards since it’s easy for these files to grow large as we automate more of our lives and we put the policies in a regional directory since we’d like each of these rules to apply to all regions, requiring us to provide the -r all parameter to Custodian. If we have some other mechanism to restrict which regions can be used we could also specify just those regions. Any policies that we write that apply to global resources (such as S3 buckets) could be placed in a corresponding global directory and only be deployed to a single region.
custodian validate regional/*.yml
custodian run --dryrun -r all -s out regional/*.yml
Our deploy step is going to install Custodian and Mailer, replace some placeholders and deploy Mailer and Custodian. Because the configuration is performed with YAML and several values in them are either resources that are created by our CloudFormation or secrets we either generate the mailer configuration and use sed substitution to keep them out of source control.
cat << EOF > mailer.yml
queue_url: $TRANSPORT_QUEUE_URL
role: $MAILER_ROLE_ARN
region: $MAILER_REGION
EOF

c7n-mailer --config mailer.yml --update-lambda

sed -i -e "s|TransportQueueUrl|$TRANSPORT_QUEUE_URL|g" regional/*.yml
sed -i -e "s|CustodianRoleArn|$POLICY_ROLE_ARN|g" regional/*.yml
sed -i -e "s|SlackWebHookUrl|$SLACK_WEBHOOK_URL|g" regional/*.yml

custodian run -s out -r all regional/*.yml
Our CodePipeline is going to require several roles to use which can be seen in our repository but Custodian’s role is worth examining in more detail since there is a very wide array of actions that can result from our policies. For our SageMaker policy we need to allow it to list and describe Notebooks, list and add tags to them and finally stop and delete them:
- PolicyName: sagemaker-allow
  PolicyDocument:
    Version: '2012-10-17'
    Statement:
      - Action:
          - sagemaker:ListNotebookInstances
          - sagemaker:DescribeNotebookInstance
          - sagemaker:ListTags
          - sagemaker:AddTags
          - sagemaker:StopNotebookInstance
          - sagemaker:DeleteNotebookInstance
        Effect: Allow
        Resource: '*'
Figuring out IAM permissions is never fun, fortunately there are two things that can help us: examining the Custodian code and manually triggering the lambdas with a CloudTrail Event. Each AWS resource is defined in code along with the permissions each action requires, allowing us to quickly look them up. Additionally we can trigger periodic rules just by executing the lambda with an empty message, or cloudtrail rules by passing them the CloudTrail Event which we can copy from the console. In the case of our SageMaker rule they look like this.
Conclusion
Cloud Custodian is a powerful tool for automating many tasks and checklists that might otherwise require the development and maintenance of custom code. By deploying it via CI/CD you can create a very powerfull and reliable tool for your organisation. I hope this post and associated repository can bootstrap your use of this tool!