This is part 2 of a 3 part series
Part 2 - Trigger notifications from new messages
The story thus far
In our last post, we set out to implement our own custom-built voicemail capability for Amazon Connect using only AWS services. We found a workaround that allows us to record calls made to our Amazon Connect number without a human agent being involved.
In this post, we’ll show how we were able to process the recorded messages and turn them into a useful notification to be sent via SNS.
Triggering the lambda
The first thing we’ll need to set up is a lambda function that gets triggered when Amazon Connect creates new objects are created in an S3 bucket.
We’ve used the Serverless Framework, which makes it easy to trigger a lambda from changes in S3 with minimal configuration:
serverless.yml
functions:
  processVoicemail:
    handler: voicemail.process
    description: "Processes new voicemail recordings by transcribing and notifying via an SNS topic."
    events:
      - s3:
          bucket: YOUR_S3_BUCKET_NAME
          event: s3:ObjectCreated:*
When the voicemail recording gets dropped into our S3 bucket, we’ll receive an event containing the file name of the new object. Within this file name is the ‘Contact ID’ of the call in Amazon Connect. We’ll use this in the next step to get some more useful information about the call.
Retrieving the Caller ID
In addition to getting the voicemail’s audio file, we probably want to know the caller’s phone number.
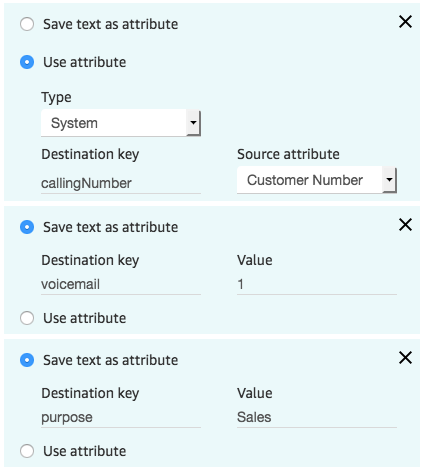
Amazon Connect doesn’t automatically include this information in the ‘Contact Trace Records’ it logs to CloudWatch. We’ll need to add a step to our contact flow to log this ourselves. We’ll also set a simple flag to tell us if a call recording resulted in a voicemail message being taken (so we can skip over others). We could also set other information like the purpose of the call if we know it from previous menu selections.
To do this, let’s configure a ‘Set Contact Attributes’ step in our main inbound contact flow.

Now for each call received, we’ll see these attributes in the CloudWatch Logs. For example:
{
    "Parameters": {
        "Value": "+61234567890",
        "Key": "callingNumber"
    },
    "ContactFlowModuleType": "SetAttributes",
    "Timestamp": "2018-07-07T01:54:40.101Z",
    "ContactId": "e9a0c9d0-efb9-4e98-bb6e-48c5ba82390f",
    "ContactFlowId": "arn:aws:connect:ap-southeast-2:111111111111:instance/2e7cbb40-b443-4b6a-8542-af38858d9d5c/contact-flow/3bfccf7d-0999-4eb6-bf1a-5a9b65108910"
}
Using the AWS SDK, we can find these log entries, then get the interesting values out:
const AWS = require('aws-sdk');
const CWL = new AWS.CloudWatchLogs({
  apiVersion: '2014-03-28',
  region: process.env.CONNECT_REGION,
});
...
const params = {
  logGroupName: YOUR_AMAZON_CONNECT_LOG_GROUP,
  filterPattern: `{
    ($.ContactId = "${contactId}") &&
      ($.ContactFlowModuleType = "SetAttributes")
  }`,
  startTime: DateTime.local().minus({days: SEARCH_PERIOD_IN_DAYS}).toMillis(),
};
const result = await CWL.filterLogEvents(params).promise();
// extract attribute values
Speech to text
Next, we’ll use Amazon Transcribe to convert our call recording audio into a readable format. This will allow us to quickly skim read or search through the notifications that arrive in our email.
There are a few steps needed here, since Transcribe processes jobs asynchronously, requiring you to wait and poll until your job is complete before retrieving the result.
First, we’ll start the job:
const params = {
  LanguageCode: 'en-US',
  Media: {
    MediaFileUri: PATH_TO_YOUR_RECORDING_FILE_IN_S3,
  },
  MediaFormat: 'wav',
  TranscriptionJobName: A_UNIQUE_JOB_NAME,
};
const result = await Transcribe.startTranscriptionJob(params).promise();
const {TranscriptionJob: job} = result;
We’ve found it takes at least 60 seconds for these jobs to complete.
Next we’ll need to poll the job until it’s no longer pending:
const params = {
  TranscriptionJobName: jobName,
};
const result = await Transcribe.getTranscriptionJob(params).promise();
// Repeat until result.job.TranscriptionJobStatus is no longer 'IN_PROGRESS'
// Then if successful, retrieve the transcription via GET request:
const transcriptUrl = job.Transcript.TranscriptFileUri;
const response = await axios.get(transcriptUrl);
We should end up with something similar to this:
{
  "jobName": "cea922d8-620c-4c7b-94ce-a8249f425e54_20180709T07_52_UTC_1531122746268",
  "accountId": "111111111111",
  "results": {
    "transcripts": [{
      "transcript": "This is a test message. [SILENCE]"
    }],
    "items": [
      // a series of individually matched words, which we don't need
    ]
  },
  "status": "COMPLETED"
}
Publish Notification
Now we’ve got all the useful information we wanted, we just need to construct a message body with all the details we’ve gathered:
function notificationMessage(voicemail) {
  const creationDate = formatDate(DateTime.fromISO(voicemail.creationDate));
  const expiryDate = formatDate(DateTime.local().plus({
    days: LINK_EXPIRY_IN_DAYS,
  }));

  return `
    Caller: ${voicemail.callingNumber}
    Called at: ${creationDate}
    Purpose: ${voicemail.purpose}

    Transcript:
    ===========
    ${voicemail.transcript}
    ===========

    Download (valid until ${expiryDate}): ${voicemail.preSignedUrl}
    -
    Download (requires log-in): ${voicemail.consoleUrl}
  `;
}
And publish it to the topic we’ll be subscribing to:
const params = {
  TopicArn: topicArn,
  Message: message,
  Subject: subject,
};
let result = await SNS.publish(params).promise();
Summary
We’ve now implemented a system to process newly recorded calls, transcribe and fetch meta-data about the original call, then notify us with these details via SNS.
If you’d like to give this a try yourself, we’ve published our full example on GitHub.
It also contains another lambda function that we’ll cover in the next part of this blog post, where we’ll show some further improvements that can give us more confidence in the system’s availability.